The 8 essential open chords for beginner guitarists (chord charts and changes)★

 | Recommended tempo: 60 bpm
|
Instructions
With these 8 open chords (C, D, E, G, A, E minor, A minor and D minor), you can play hundreds of songs. Here is how to finger them, which order to learn them in and how to change chords without gaps.
The 8 open chords
An open chord uses open strings: no barre, it is where every guitarist starts. An "m" means minor (Am = A minor).
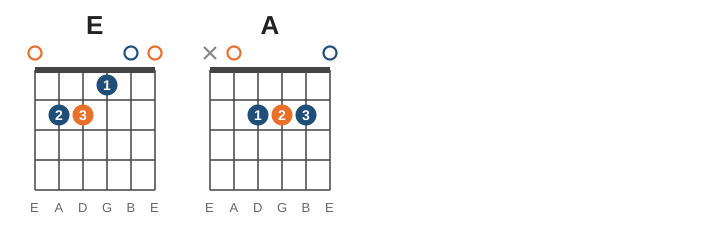
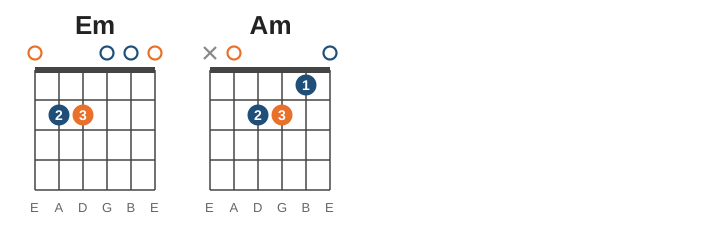
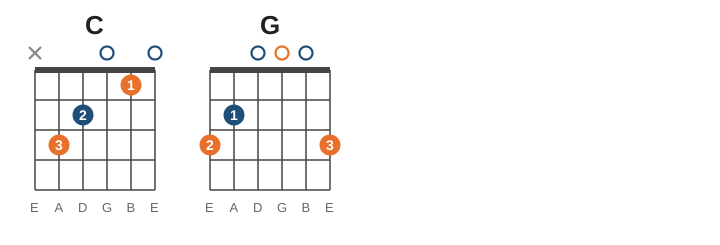
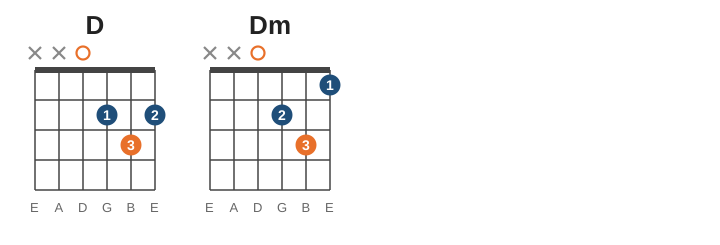
How to read the charts: you are looking at the neck from the front, low E string on the left; the thick bar at the top is the nut. The numbers in the dots are your fretting-hand fingers: 1 = index, 2 = middle, 3 = ring. An empty circle above a string = play the open string, a cross = do not play that string. In orange: the root (the note that gives the chord its name); start your strum from it.
Which order to learn them in?
- Em and Am: the easiest, with only two or three fingers.
- C and G: the two most used chords in popular music.
- D and Dm: only four strings played, be careful not to hit the two low strings.
- E and A: E is the same shape as Am, one string higher; A is played with three fingers squeezed on fret 2.
Allow one pair of chords per week: in a month, you have all 8.
Fingering a chord properly
- Fingertips, nicely curved, so you do not mute the next string.
- Right behind the fret (body side), not in the middle of the fret space: less pressure, less buzzing.
- Thumb behind the neck, roughly opposite your middle finger.
- Check string by string: pick each string separately; if one sounds wrong, fix that finger.
- Sore fingers? That is normal for the first two or three weeks. Play 10 to 15 minutes a day rather than one hour at once: calluses form quickly.
Changing chords without gaps
The real challenge is not making a chord, it is getting to the next one in time. Three tips:
- Pivot fingers: from C to Am, fingers 1 and 2 stay put, only finger 3 moves. From Em to E, just add finger 1. Always look for what stays in place.
- Put all fingers down at once, like a stamp, instead of one at a time.
- Never stop strumming: if the next chord is not ready, strum the open strings on the last beat. Your strumming hand keeps the time, your fretting hand follows.
Exercise 1: the one-minute change
1 minute per pair, count your changes:

Em <-> Am     C <-> G     D <-> G     Am <-> C
E  <-> A      D <-> A     Am <-> E    Dm <-> Am

Goal: 30 clean changes per minute.
Write down your score every day: it is very motivating to watch it go up.
Exercise 2: strumming
With a metronome at 60 bpm, start with 4 downstrokes per bar (level 1), then move on to the most used folk strumming pattern (level 2):
Level 1:  1   2   3   4         Level 2:  1   2 and  and 4 and
          D   D   D   D                   D   D  U    U   D  U

D = downstroke, U = upstroke
In level 2, your strumming hand keeps a constant pendulum motion (down-up on every beat) and only hits the strings on the strokes shown.
Exercise 3: 5 chord progressions to play
1) G   | Em  | C   | D   |   (the '50s progression)
2) Am  | Dm  | E   | Am  |   (minor, Spanish flavour)
3) E   | A   | E   | A   |   (rock / blues)
4) C   | Am  | Dm  | G   |   (pop)
5) D   | G   | A   | D   |   (folk)

One bar = 4 beats.
Once you are comfortable, put it all into a real song: Knockin' on Heaven's Door uses only G, D, Am and C. To see any chord across the whole neck, use the interactive fretboard (Chords mode).
Exercice 1
The 4 major chords: C, D, E and G. Fingers: 1 = index, 2 = middle, 3 = ring. In orange: the root.

Exercice 2
A and the 3 minor chords: Em (E minor), Am (A minor) and Dm (D minor). Cross = string not played, empty circle = open string.

Exercice 3
Week 1: Em and Am. Switch between them: fingers 2 and 3 keep the same shape and move down one string. Strum Em from the low E, Am from the A string.
Exercice 4
Week 2: C and G. For C, the ring finger on the A string gives the root: do not strum the low E. For G, all 6 strings ring.
Exercice 5
Week 3: D and Dm. Strum only the 4 high strings. From D to Dm, only the finger on the high E string changes.
Exercice 6
Week 4: E and A. E = the Am shape moved one string lower. For A, squeeze the 3 fingers into fret 2 and let the high E ring.